Battery switch on travel trailer function is crucial for managing your RV’s power. Understanding how these switches work – whether single, dual, or rotary – is key to preventing dead batteries and protecting your expensive electronics. This guide breaks down everything you need to know about choosing, using, maintaining, and troubleshooting your travel trailer’s battery switch, from basic operation to advanced electrical system integration.
We’ll explore the different types of switches, their pros and cons, and provide step-by-step instructions for safe operation and maintenance. We’ll also cover common problems and offer solutions to get you back on the road quickly. Think of this as your ultimate guide to mastering your travel trailer’s power system!
Battery Switch Types in Travel Trailers

Choosing the right battery switch for your travel trailer is crucial for managing your power sources and preventing electrical issues. Understanding the different types available will help you make an informed decision based on your needs and budget. This section details the common types, their pros and cons, and a comparison to aid your selection.
So, you’re an audiophile who travels? Awesome! Check out this guide on building the perfect audiophile travel setup for amazing sound on the go. It covers everything from portable DACs to noise-cancelling headphones. Then, for some more in-depth tips and tricks, dive into this other fantastic resource on audiophile travel aetup – it’s got some seriously great advice on packing and protecting your gear.
You’ll be enjoying your favorite tunes wherever your adventures take you!
Single Battery Switches
Single battery switches are the simplest type, designed for a single battery setup. They essentially act as an on/off switch, connecting or disconnecting the battery from the trailer’s electrical system. This is suitable for trailers with a single 12V battery powering the interior lights and other low-power devices. The advantage is their low cost and simplicity. However, they lack the flexibility of managing multiple batteries or isolating them for maintenance.
Dual Battery Switches
Dual battery switches, as the name suggests, allow you to manage two batteries independently. They usually offer three positions: “Both” (connecting both batteries in parallel), “Battery 1,” and “Battery 2.” This setup is common in trailers with a house battery (for appliances) and a starting battery (for the vehicle’s engine). The benefits include the ability to isolate batteries for charging or maintenance, and extending your off-grid time by using the batteries independently.
The drawback is the increased cost compared to a single switch.
Rotary Battery Switches, Battery switch on travel trailer function
Rotary battery switches provide more sophisticated control over multiple batteries. These switches often have several positions, allowing you to select which battery or combination of batteries are connected to the trailer’s electrical system. Some advanced models even include a “Off” position to completely disconnect all batteries. Rotary switches offer excellent flexibility and safety features but come with a higher price tag and slightly more complex operation.
Comparison Table of Battery Switch Types
| Feature | Single Switch | Dual Switch | Rotary Switch |
|---|---|---|---|
| Number of Batteries Managed | One | Two | Two or More |
| Typical Cost | Low ($10 – $30) | Moderate ($30 – $70) | High ($50 – $150+) |
| Maintenance | Low | Low | Low to Moderate (depending on complexity) |
| Flexibility | Low | Moderate | High |
Function and Purpose of the Battery Switch
The battery switch in your travel trailer is a crucial component of its electrical system, acting as a central control for your trailer’s batteries. It’s essentially a master switch that allows you to disconnect or connect your house batteries to the various power sources available, preventing issues and maximizing the lifespan of your batteries. Understanding its function is key to safe and efficient RVing.The battery switch isolates and connects your travel trailer’s house batteries to different power sources, such as shore power (hookups at campgrounds), a generator, or solar panels.
When you’re plugged into shore power, the switch can be used to charge the batteries while simultaneously powering your appliances. If you’re off-grid, the switch allows you to use the stored power in your batteries to run your lights, fridge, and other systems. Similarly, when using a generator or solar panels, the switch enables charging and powering your trailer.
Proper use of the switch ensures that your house batteries aren’t drained unexpectedly when they’re not needed.
Battery Switch and Prevention of Battery Drain
The battery switch plays a vital role in preventing unintended battery drain. When you’re not using your travel trailer for an extended period, switching the batteries to the “off” position completely isolates them from the trailer’s electrical system. This prevents any parasitic drain from low-level power draws, such as clocks or smoke detectors, which could eventually lead to a completely discharged battery.
A discharged battery can suffer permanent damage and require replacement, a costly and inconvenient repair. Therefore, using the battery switch correctly is essential for preserving battery health and avoiding this issue.
Battery Switch and Protection of Sensitive Electronics
Besides preventing drain, the battery switch indirectly protects sensitive electronics within your travel trailer. By disconnecting the batteries, you eliminate the risk of power surges or voltage fluctuations that can damage delicate components like inverters or control boards. This is especially important when working on the electrical system or when the trailer is stored for long periods. The switch acts as a safety precaution, limiting the potential for electrical damage that could lead to expensive repairs or system failures.
Troubleshooting Common Battery Switch Issues
Your travel trailer’s battery switch is a crucial component, and problems with it can leave you stranded without power. Understanding common issues and how to troubleshoot them can save you time and frustration. This section will guide you through identifying and resolving typical battery switch malfunctions.
Battery switch problems often manifest as a complete lack of power to your trailer’s appliances, or intermittent power failures. The root cause is usually either a faulty switch itself or a problem with the connections. Less frequently, corrosion or loose wiring in the system can mimic a switch problem.
So, you’re an audiophile who travels? Awesome! Check out this guide on building your perfect audiophile travel setup for amazing sound on the go. It covers everything from portable DACs to noise-cancelling headphones. But if you need more in-depth advice, consider this other fantastic resource on audiophile travel aetup – it dives deep into specific gear recommendations and packing tips.
Remember, quality sound doesn’t have to stay at home!
Troubleshooting Flowchart for Battery Switch Malfunctions
A systematic approach is key to effective troubleshooting. The following flowchart helps guide you through the process of diagnosing the issue:
Start by checking if the battery switch is in the “ON” position. If not, switch it on and check if power is restored. If power is still out, move to the next step. If the switch is already in the “ON” position and there’s no power, proceed to test the battery voltage using a multimeter. If the battery voltage is low or absent, charge the battery.
If the battery is fully charged and still no power, proceed with the next step. Check all connections for tightness and corrosion. Clean and tighten any loose or corroded connections. If the problem persists, it is likely a faulty battery switch and should be replaced.
Inspecting and Cleaning Battery Switch Terminals and Connections
Dirty or corroded terminals are a frequent cause of battery switch problems. Regular cleaning prevents these issues and extends the life of your switch.
Before starting any work, always disconnect the negative (-) battery terminal first to prevent accidental short circuits. This is a crucial safety precaution. Once disconnected, carefully inspect the terminals and connections on the battery switch itself, as well as the wiring leading to and from it. Look for any signs of corrosion (a whitish-green powdery substance), looseness, or damage to the wires.
Use a wire brush to clean any corrosion from the terminals and connections. For stubborn corrosion, a baking soda and water paste can be effective. Apply the paste, let it sit for a few minutes, then scrub with the wire brush and rinse with clean water. After cleaning, ensure all connections are tight. Re-connect the negative (-) terminal last.
Integration with other Electrical Systems: Battery Switch On Travel Trailer Function
Your travel trailer’s battery switch isn’t an isolated component; it’s a crucial link in a chain of electrical systems working together to power your adventures. Understanding its interaction with other parts is key to maximizing your RV’s efficiency and lifespan.The battery switch acts as the main on/off control for your house batteries. When it’s on, power flows from your batteries to various systems like lights, water pumps, and appliances.
This power may pass through a converter, which transforms 12V DC battery power into 120V AC power for your household appliances, or an inverter, which does the opposite, converting 120V AC to 12V DC for specific devices. The switch’s position dictates whether your house batteries are supplying power directly or indirectly through these conversion systems. Incorrect usage or faulty switches can cause issues with these components, resulting in malfunctions or reduced performance.
Battery Switch Impact on Battery Lifespan and Energy Efficiency
Proper use of the battery switch significantly affects both battery lifespan and energy efficiency. Leaving the switch in the “on” position when the trailer is not in use drains your batteries, shortening their lifespan. This is especially true if there are small parasitic draws (like a clock or a carbon monoxide detector) that are continuously depleting the battery charge.
Conversely, consistently turning the switch off when not using the trailer conserves battery power, extends battery life, and minimizes the strain on your charging system (like your solar panels or shore power). Efficient use means less frequent replacements, saving you money in the long run.
Battery Switch Performance in Different Power Scenarios
The effectiveness of different battery switch configurations varies depending on your power source. For example, during off-grid camping, a switch allowing for complete isolation of the house batteries is essential. This prevents accidental draining of your batteries if a device malfunctions or a short circuit occurs. A properly functioning switch also allows you to selectively power different systems.
In contrast, when connected to shore power, the switch’s role is less critical as the primary power source is the external supply. However, even then, turning off the switch when not using the trailer ensures that the shore power isn’t used to continuously charge your batteries, thus prolonging their lifespan and saving energy. A simple on/off switch might suffice in shore power situations, but a more sophisticated switch offering multiple battery banks or load shedding features proves beneficial in off-grid scenarios.
Illustrative Examples of Battery Switch Installations
Understanding how a battery switch is installed in a travel trailer is crucial for safe and efficient power management. This section provides detailed examples to clarify the process and the variations depending on the switch type. We’ll cover a typical installation, explore the internal workings of a rotary switch, and highlight differences in installation procedures for various switch types.
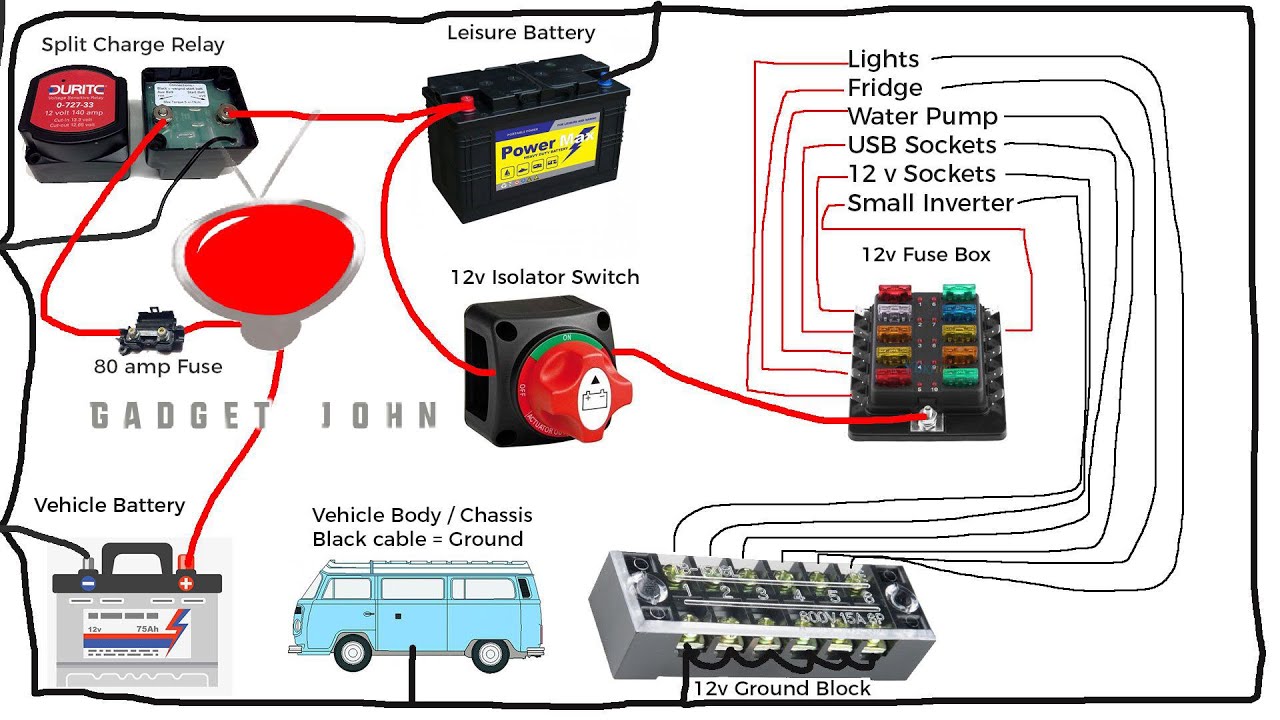
Typical Battery Switch Installation in a Travel Trailer
A typical installation involves a rotary battery switch, located in a readily accessible location within the trailer, often near the battery compartment. The switch connects the house batteries to the trailer’s electrical system. Wiring typically involves heavy-gauge wire (at least 4 gauge, depending on battery size and amperage draw) for safety and to minimize voltage drop. The positive (+) cables from the batteries connect to the switch’s input terminals.
From the switch’s output terminals, the positive cable runs to the positive bus bar in the main electrical panel. A negative (-) cable directly connects from each battery to the chassis ground. This is often done with a heavy gauge ground wire secured to a clean metal surface on the trailer’s frame. A properly installed battery switch will have clearly marked terminals and a cover to prevent accidental contact.
The installation should follow all relevant electrical codes and manufacturer’s instructions for safe operation.
Internal Workings of a Rotary Battery Switch
Imagine a rotary switch as a multi-position selector within a sturdy, insulated housing. Inside, you’d see a central rotating shaft connected to multiple contacts. These contacts are arranged in a circular pattern, with each position corresponding to a different circuit connection. In a typical two-battery setup, one position connects to the first battery, another to the second, a third connects both in parallel, and a fourth disconnects both.
These contacts are typically made of robust materials like copper or silver alloy to ensure good conductivity and resistance to corrosion. The rotating shaft is mechanically linked to the external control knob. Turning the knob physically moves the central shaft, engaging different contacts to switch between the various battery configurations. This mechanism is often sealed within the housing for protection from moisture and debris.
Installation Procedures for Different Battery Switch Types
Different battery switch types – such as rotary, blade, and electronic switches – require slightly different installation procedures. Rotary switches, as described above, involve connecting positive cables to the input and output terminals, and grounding the negative cables to the chassis. Blade switches often use a similar principle, with multiple blades acting as individual switches that can be engaged or disengaged individually.
Electronic switches, however, usually involve more complex wiring diagrams. These might require connecting to a control panel or incorporating them into the trailer’s existing electrical system via a more sophisticated wiring harness. Installation instructions specific to each switch type should be followed carefully, as the wiring configuration and safety precautions vary. Improper installation of any type of battery switch can lead to electrical hazards.
Mastering your travel trailer’s battery switch is all about understanding its role in managing your power sources and protecting your investment. By following the safety guidelines and maintenance schedule, you’ll ensure years of reliable power and worry-free adventures. Remember, regular inspection and proactive maintenance are your best defenses against unexpected electrical issues on the road. Happy travels!
Expert Answers
What happens if my battery switch fails?
A failed switch might prevent you from accessing your house batteries, leading to a dead battery and loss of power. You might need a replacement.
Can I use a different type of battery switch than what came with my trailer?
Possibly, but it’s crucial to ensure compatibility with your trailer’s wiring and electrical system. Consult an RV electrician if you’re unsure.
How often should I clean my battery switch terminals?
At least once a year, or more often if you notice corrosion or poor connections. Clean them with a wire brush and baking soda solution.
Why is my battery draining even when the switch is off?
This could indicate a parasitic draw from a device that’s always on, a faulty switch, or a wiring problem. Check your trailer’s fuses and wiring for issues.
